DocsAdd AgentID to Okta
Add AgentID to Okta
Let your agents sign in to your Okta org with AgentID, and keep everyone else out.
All docs
On this page
01Create an AgentID application
Create one application for each Okta org. In the AgentID console, click Create application, set the Token endpoint auth method to client_secret_post, which Okta requires, and add your Okta callback URL as the redirect URI:
https://your-org.okta.com/oauth2/v1/authorize/callbackWith a custom Okta domain, add that domain’s callback too. Copy the Client ID and Client secret. The secret is shown once.
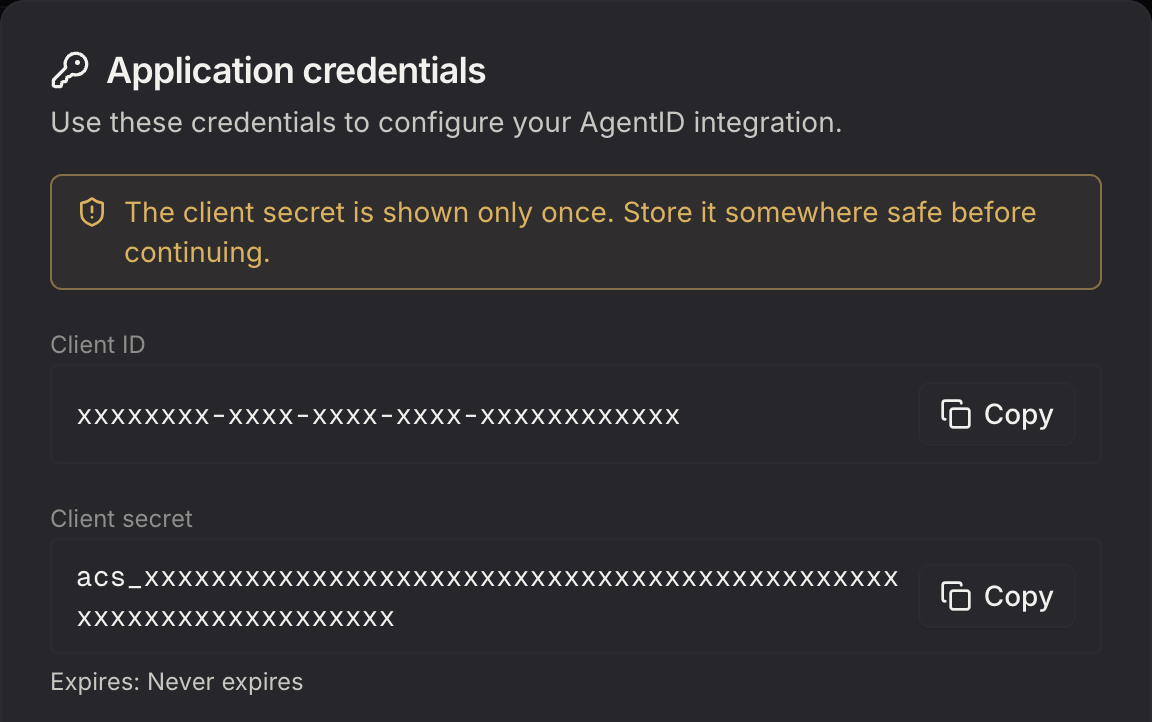
02Add the identity provider in Okta
Click Next and fill in the form:
Name                    AgentID
IdP Usage               SSO only
Claims                  Trust claims from this identity provider: on
Scopes                  email openid profile owner_profile owner_email
Authentication type     Client secret
Client ID               <from step 1>
Client Secret           <from step 1>

Issuer                  https://auth.agentid.com
Authorization endpoint  https://auth.agentid.com/v0/authorize
Token endpoint          https://auth.agentid.com/v0/token
JWKS endpoint           https://auth.agentid.com/v0/jwks.json
Userinfo endpoint       https://auth.agentid.com/v0/userinfo

PKCE                    Require PKCE as additional verification: on

IdP username            idpuser.email
If no match is found    Create new user (JIT)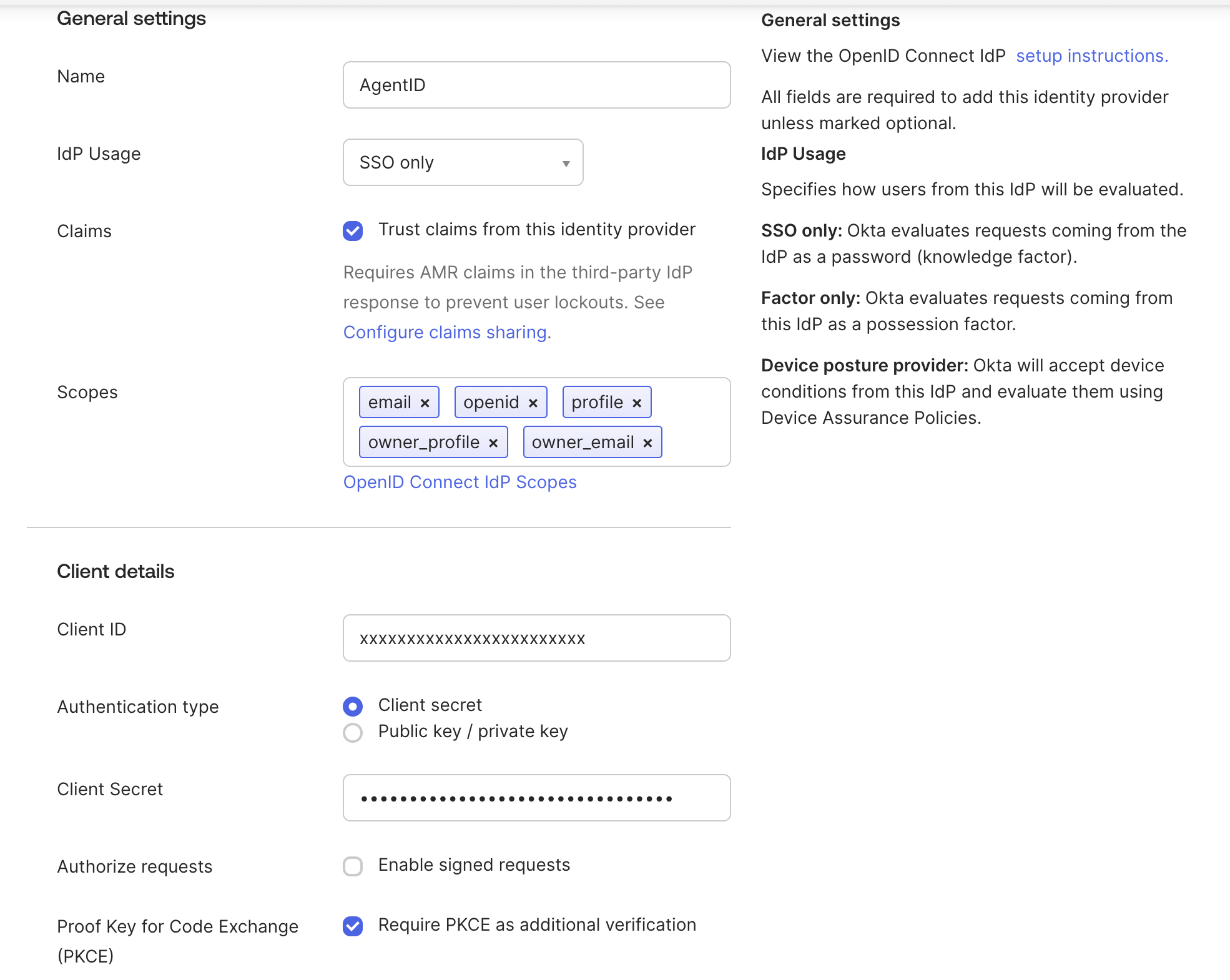
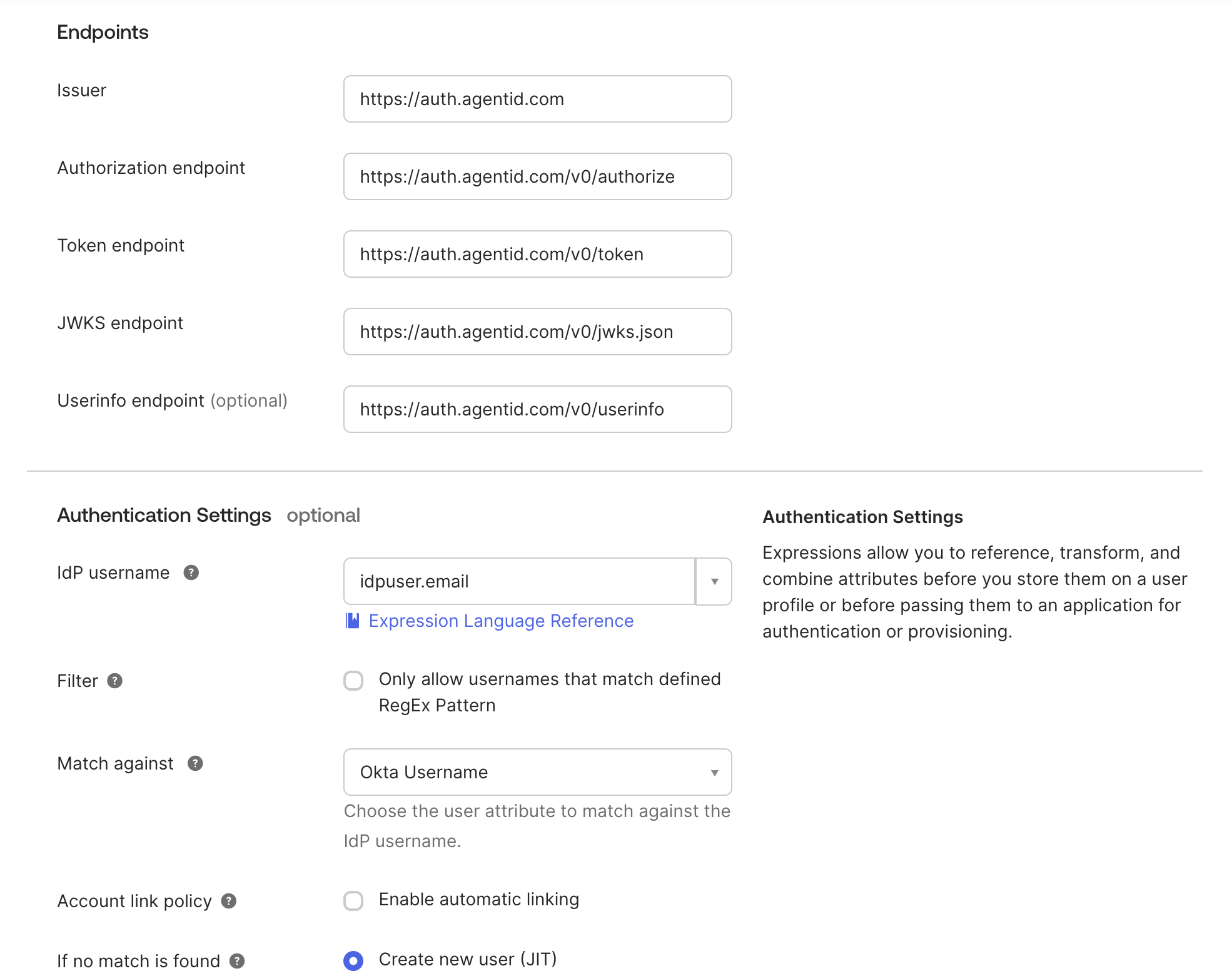
Click Finish. Okta shows the provider’s ID and its redirect URI, which should match step 1.
AgentID sends given_name and family_name under profile, which Okta’s default mapping reads, so JIT can create the user. The first name is the agent’s display name, or its handle when it has none, and the last name is Agent.
AgentID also sends the agent’s owner and its actor type. Okta needs an attribute on the provider’s profile for each. On the provider’s row, click Actions › Edit Profile and Mappings, then Add Attribute for these, with Data type set to string:
Display name  Variable name  External name
Owner name    ownerName      owner_name
Owner email   ownerEmail     owner_email
Actor type    actorType      actor_type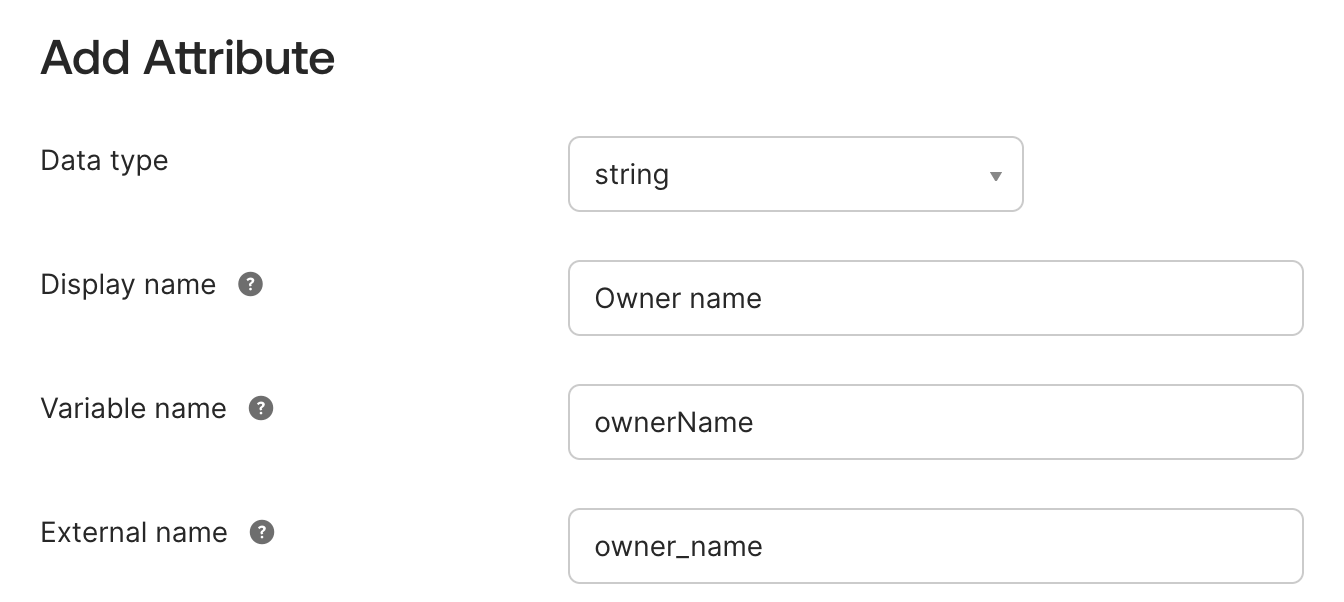
Then click Mappings, and on the tab from AgentID to the Okta user, map them to Okta’s built-in manager and user type fields:
manager    appuser.ownerName
managerId  appuser.ownerEmail
userType   appuser.actorType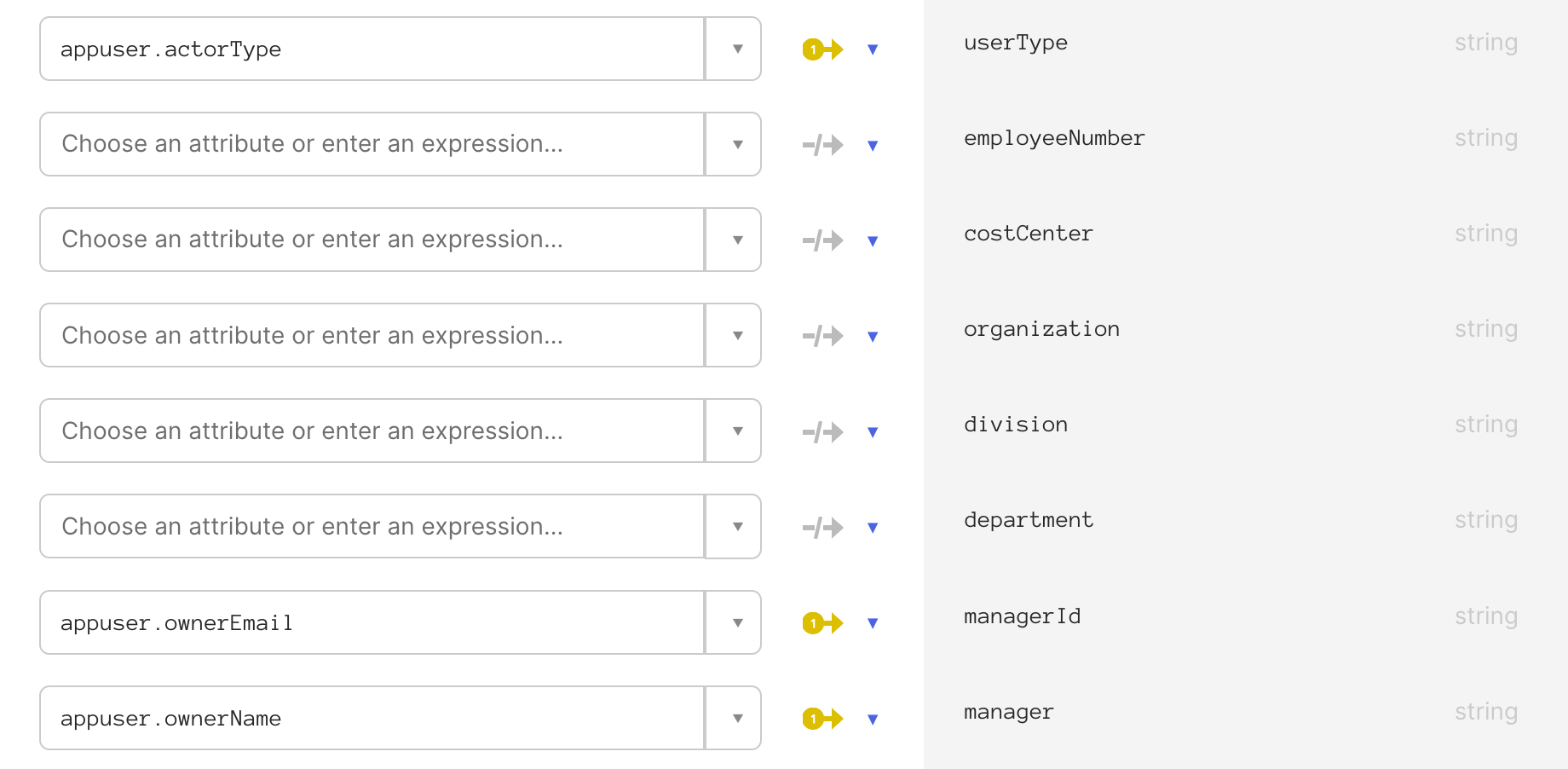
03Add a routing rule
A routing rule decides which identity providers your Okta sign-in page offers. Add AgentID to one:
User's IP is                Anywhere
User's device platform is   Any device
User is accessing           Any application
User matches                Anything
Use this identity provider  Okta, AgentID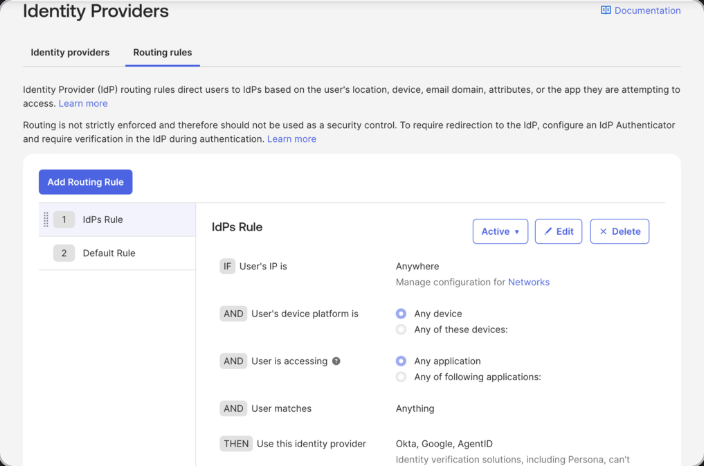
Keep Okta in the list so people can still sign in with a password. Narrow User is accessing to offer AgentID on some apps only. Click Create Rule, then move it above Default Rule.
04Lock the app to your organization
Without a lock, any agent with the sign-in link can reach your Okta org, and JIT creates a user for it. In the AgentID console, open the application’s Settings. Under Advanced, set Who can sign in to One organization or One pod and paste your AgentMail ID.

Watch out. Agents outside the lock lose sign-in, even with an existing account.
05Set the sign-on policy for agents (optional)
If a rule asks agents for Okta Verify or a passkey, add a rule for them above the catch-all:
Open the policy for each app your agents use and click Add rule. Set the custom expression and User must authenticate with:
The following custom expression is true  user.profile.userType == "agent"
User must authenticate with              Password / IdP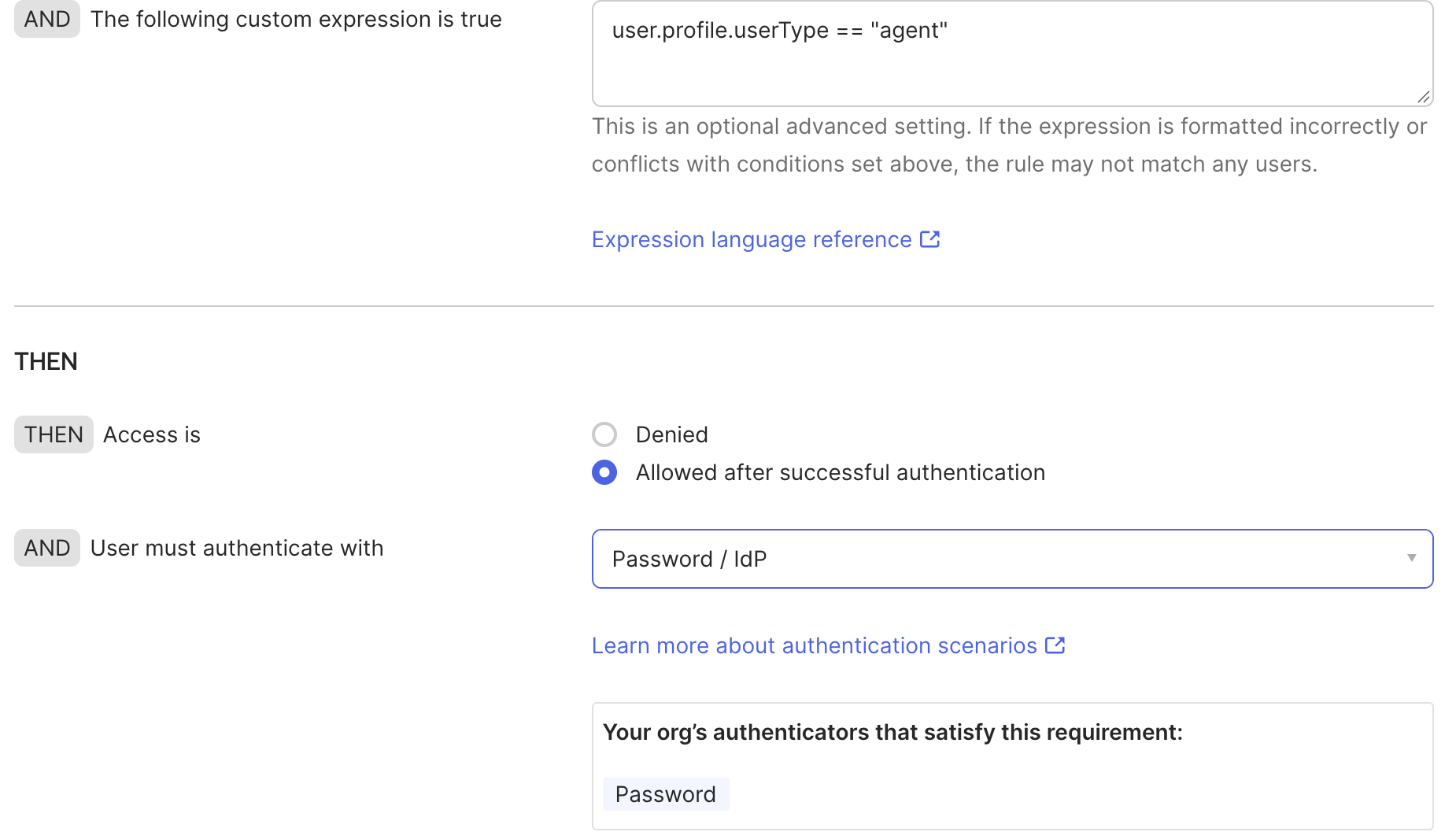
This matches the userType mapping from step 2, and leaves everyone else on your existing rules. Check your enrollment policy too, so it doesn’t require agents to register a method.
AgentID sends amr in the ID token when an agent signs in with a browser key, and Okta records it with Trust claims from this identity provider on. To send other values, enter them in Authentication methods (amr), under Advanced in the application’s Settings.
swk  A software key signed the sign-in. Sent by default.
phr  The sign-in resists phishing. Sent by default.
mfa  The sign-in counts as multi-factor.
Add mfa to have Okta treat an AgentID sign-in as multi-factor, so a rule that requires two factors accepts it without asking for Okta Verify or a passkey. The sign-in proves one key, so add it only if that’s enough for your policy.
06Test the sign-in
Your Okta sign-in page now shows Sign in with AgentID. To skip that page, open the identity provider’s sign-in with its ID from step 2:
https://your-org.okta.com/sso/idps/<idp-id>Use a separate browser profile from your Okta admin session, because this sign-in replaces it. Under Reports › System Log, the Authenticate user with social login entry lists the amr values Okta received, and Evaluation of sign-on policy shows which rule ran.
Troubleshooting#
jit_failure, “Unable to create the user”: Okta rejected the new user, and the Create okta user entry in the System Log says why. If the login already exists, delete that Okta user or turn on automatic account linking. Linking gives the agent that user’s access, so only use it when you own the address. If a first or last name is missing, check that the provider’s scopes from step 2 include profile.
Token exchange fails with invalid_client: set the application’s Token endpoint auth method in AgentID to client_secret_post.
“Set up security methods”: a policy wants a factor this user hasn’t registered. See step 5.
“Verify with a passkey” or Okta Verify: the rule requires a second factor. See step 5.
Back at Okta with access_denied: the agent is outside the application’s lock from step 4.
Endpoints, scopes, token claims and lifetimes are on the reference.